Mix n Match! Get the cheapest FREE when you buy any 3 Canvas Prints and/or Hardcover Photobooks | Promocode: MixnMatch-24 until 7 August 2024
RapidStudio’s online photobook editor offers beautiful, professional layouts that are easy to use. If you prefer to use alternative design software, follow the instructions below to set up your document in your preferred program and share your document with RapidStudio for printing.
PAGES and COVERS have different set up requirements and are treated differently –we cover pages first, then covers.
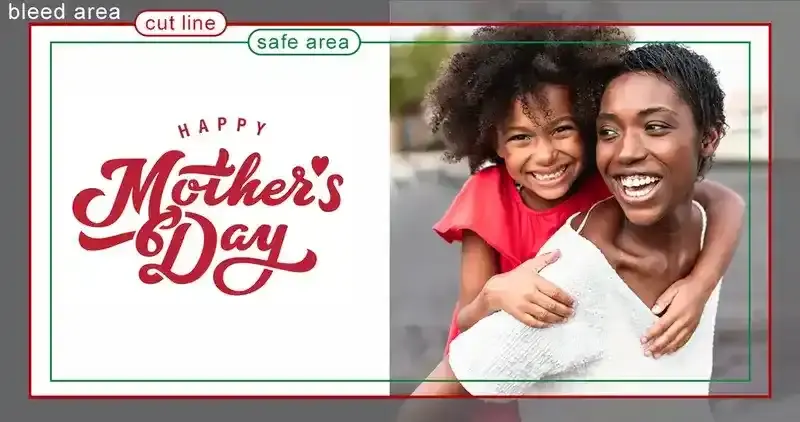
After you’ve chosen your book size, you now need to set up your document with bleed. Bleed is artwork that goes beyond the cut line of your page. The project is then cut down to size with the appearance that the image is “bleeding” off the edge of the paper. This is important to avoid white edges on your finished pages.

Pages in our Ultimate Range are always prepared as DOUBLE PAGE SPREADS
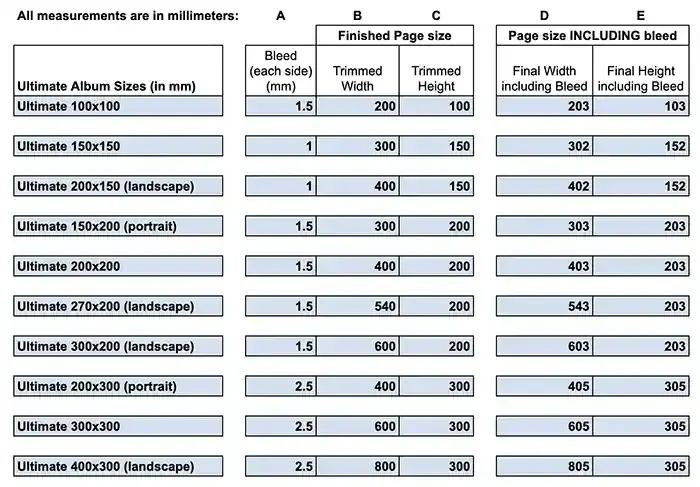
Your photobook pages will need to be set up with bleed on all four sides of the double page spread. Bleed amounts vary depending on the size of your book
(refer to the table below, column A indicates the amount of bleed).

Below is an example of a 400 x 300 (landscape*) page:
The dimensions from left to right (width) are:
2.5mm bleed + 800mm page width + 2.5mm bleed = 805
The dimensions from top to bottom (height) are:
2.5mm bleed + 300mm page height + 2.5mm bleed = 305mm
Use the formula below for your pages
Width: ?mm (bleed left) + ?mm (page width) + ?mm (bleed right)
Height: ?mm (bleed top) + ?mm (page height) + ?mm (bleed bottom)
Hint: We suggest in your page set up you add a safe area guideline (that won’t print) 10mm in from the edge on each side. Safe area is an imaginary area to create a margin between your design and the edge of your page. We recommend it should be 10mm from the edge of the page, any closer and you stand the risk of placing your image too close to the edge of the page – which is often visually unappealing. If you do not use this imaginary margin, your job might not have a professional look, by keeping things like text and pictures within this margin (unless you want them to bleed) you will get a visually appealing page.
Covers
If you are making a photobook with a photo cover, we recommend you make your cover directly in the RapidStudio editor.
The reason for this is there are many layout options for photo (personalized) covers. These layouts are all preset in the RapidStudio editor – simply choose your layout option and insert your image into the space provided.
Alternatively, if you wish to design your cover picture in your preferred program, click here for the photoshop presets for every cover option.
Coming soon: Printed covers are coming soon. We will update this document to include directions on how to prepare your cover pages in your editor of choice when these come online in our store.
Once your album design is finished you will need to export the pages in JPEG at 300 DPI (high quality print) in sRGB colourspace.
We do not need crop marks on your document or bleed – because remember, we’ve already setup the document with bleed in step 1 above. So make sure if your preferred program gives you the option to add crop marks or bleed that you deselect these options.
Handy hint: If you use a naming hierarchy for the double page spreads that includes numbers 01, 02 etc it will allow you to autofill your pages and they will populate in the
right order.
In this final step, you submit your files to RapidStudio by uploading the spreads to the RapidStudio online editor.
This step is where you choose your product options- cover style, cover material and colour etc. This process also enables you to double check your page appears perfectly on the preview – do the pages bleed right to the edge, do important elements on each page appear in the safe area? etc.
a. Login to your RapidStudio account
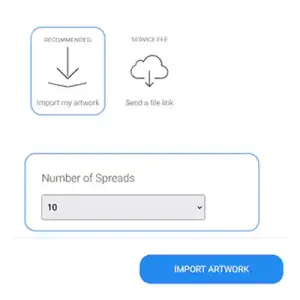
b. Select "Ultimate Albums" from the "books" tab from the top menu bar and from the drop down menu. Select the calculator/import artwork button on the bottom left-hand corner of the screen .

c. Choose your book style/variants offered on the right-hand side of the screen – size, cover type, cover material, page thickness, embossing etc etc. (your selections here go through to our factory as a set of instructions on how to make your book).
The last option at the bottom of the screen is ‘number of spreads. It’s important this corresponds with the number of spreads you exported in step 2 above. If they don’t match, production of your book may be delayed while our support team get in touch to confirm your order.
Once all selections have been made, click on the blue import artwork button.
This will launch the RapidStudio editor WITH the book size, style and other variants you selected.
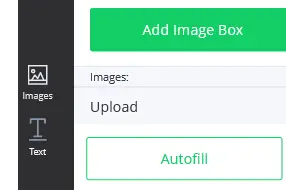
d. Upload your cover picture and spreads: - click the image button on the vertical menu bar and select ‘upload’ (or gallery if you want the image files to be there for future logins).
Cover: if you have a photo/personalized cover – insert your cover picture FIRST.
Pages: After you’ve populated your cover, select the autofill button – this uploads your spreads into the editor so we can receive your order.
Important: Click through you book to make sure all the pages appear in the frame correctly (no unintended white edges, images bleed off page, everything important is within the safe area), and the pages appear in the right order.
If your book has more than the standard minimum pages, when you click autofill a pop up box will appear asking to add more pages. Select OK and the exact number of pages you need as per your design will be created.


Once complete click add to cart.
Continue shopping or follow payment process/checkout.
If you have trouble of any kind, we are here to help and make it easy for you.
If you’re a member of our Professional Alliance Program we have a dedicated support line for you: pro@rapidstudio.co.za and 011 225 0333.